
Successful Dual Battery Setup with Smart Isolator Kit for Camper Van – Chevy Express
I was doing some work on my buddy’s van and I thought I would go ahead and show you guys just how simple you can actually make a dual battery system, especially on a full size van like this Chevy Express.
We didn’t do a full conversion in this van like we did with mine, but he did want some extra power to power a fridge and to charge phones and tablets and things.
This one’s got a 5.7 small block in it, so it doesn’t need a second battery like the diesel vans do to start. But we were able to buy the battery tray that mounts on the frame rail for the diesel van and it bolts right into this chassis. And in that tray, we were able to drop a standard deep cycle battery. At this point, I figured it’d be easier to jump into the Airgram and do a little voiceover to explain how the wiring of the system works.
Circuit Breaker
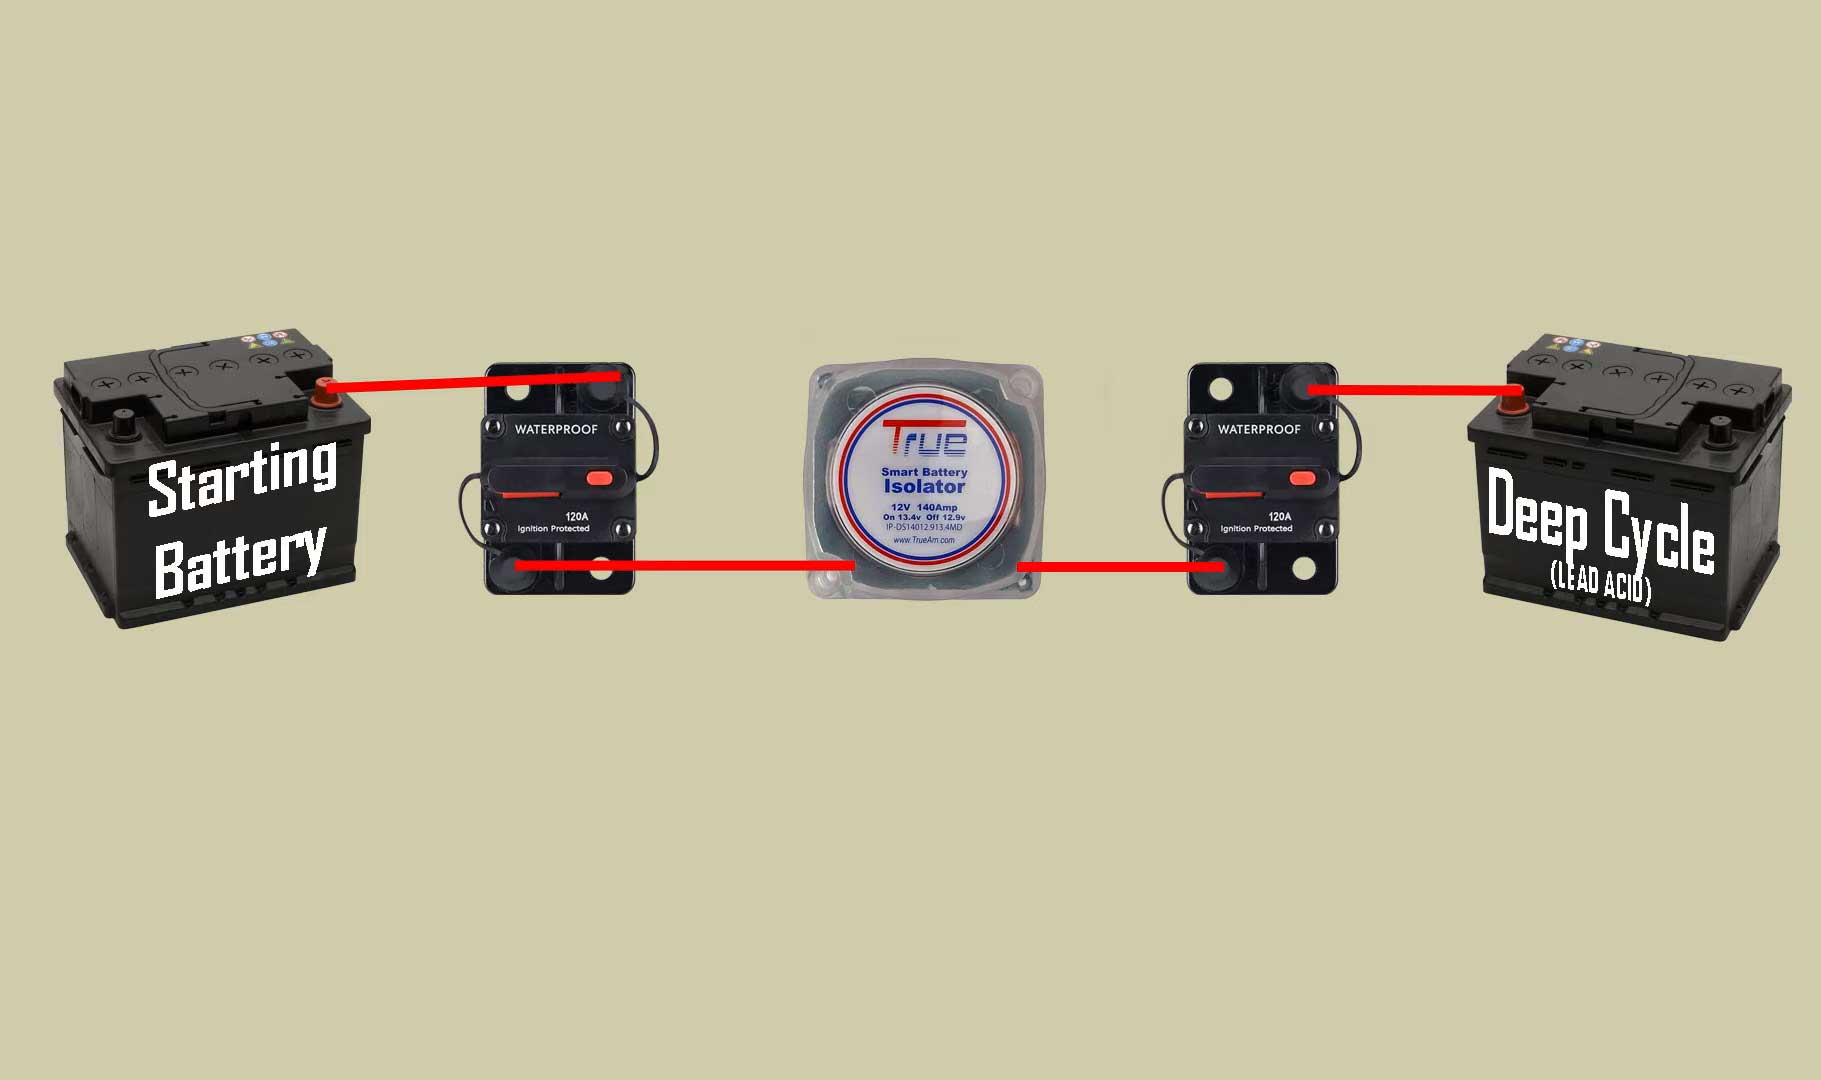
So to wire in an extra battery that’s going to be safe and isolated from this battery, we’re going to need three main components. Off the positive post of the starting battery, we’re going to wire in a nice circuit breaker. You could also use an inline fuse. I like the circuit breakers because you’re able to reset them or disconnect them if you want to service the battery or kill the power down the line. Just makes things a little bit nicer and easier.
Smart Battery Isolator
 Plus, if it blows, you can just reset it. Coming off the other end of that circuit breaker, we’re going to be connecting to our voltage sensing relay, the Smart Battery Isolator by TrueAm. This is what’s going to control the connecting and disconnecting for auxiliary battery and protect our starting battery from getting discharged.
When we want to run our accessories inside the van coming off of the Smart Battery Isolator, we’re going to wire in another circuit breaker. It may seem redundant, but this is the proper way to do it. You want the ability to disconnect on either side of that relay.
Using Chassis for Negative Wire
Coming off of that circuit breaker, we’re going to connect the positive end into the positive end of our deep cycle battery. You might be wondering what you do with the negative end of the deep cycle battery. You can either connect it all the way back to the starting battery and connect it on the negative of that, but it’s usually easier and quite a bit cheaper to connect it to a nice ground spot on the chassis.
I did this by grinding off some paint and putting a rib nut into an existing hole in the frame rail and then bolting a negative terminal lug straight to the frame rail. That is essentially all you really need to have the auxiliary battery wired up.
It’s three components plus a battery. It’s pretty straightforward and not too complicated. But you might be wondering how do we then wire in our accessories like USB plugs and things like that. So let’s jump over to a fresh page and I’ll explain that. So here’s our deep cycle battery again. It is still connected to the chassis, obviously, and it is still connected to the starting battery through the VSR and everything. But I didn’t include it on this picture just to make it cleaner.
Using Fuse Block
From the positive post of this battery we’re going to connect yes to another circuit breaker. And then from that circuit breaker we’re going to connect to the positive connection on our fuse block. And I like using a fuse block that has a negative bus bar too.
We’re going to connect a negative wire to the fuse block down to the deep cycle battery. Now, from that fuse block is where we wire in our accessories, like our USB plugs, our twelve volt cigarette lighter plugs, Led lights, things of that nature.
So we’re going to take a positive wire from the fuses with the appropriate size fuse for the accessory you want, and then a negative wire to the negative bus in the fuse block. Connect it up, find a place to mount your accessory and that’s all there is to it.
One thing to make sure you do is total up the amperage of all the individual accessories you want to wire in and make sure that that total does not exceed what the fuse block is rated for. And likewise.
Make sure that the circuit breaker you installed before the fuse block does not exceed what your fuse block is also rated for. Because you don’t want the circuit breaker to allow more current through the fuse block than the fuse block is rated for.
It’s simple addition. Add up your totals and make sure nothing exceeds what it’s rated for. So that’s really all there is to it. You could do a simple system like this in pretty much any truck, camper, van, overland build, doesn’t have to be expensive, doesn’t have to cost a lot, and it’ll still function and do most of the things that you want it to do.
So that’s it for this video. Let me know if you have any questions and put them in the comments down below, and I’ll see you on the next one.