

Step-by-Step DIY: How to Install a 12V Dual Battery System in Toyota Prado Using True® Isolator Kit
Installing a 12V dual battery system in your Toyota Prado is one of the best upgrades for off-road adventures, camping, and powering accessories. With a True® battery isolator kit, you can safely run fridges, lights, and electronics without risking your starter battery.
This step-by-step DIY guide will walk you through the entire installation process—from preparation to final testing.
Why Install a Dual Battery System in Your Toyota Prado?
A dual battery setup allows your vehicle to:
- Power accessories without draining the starter battery
- Ensure reliable engine starting at all times
- Support off-grid travel and camping setups
- Improve electrical efficiency with controlled charging
A properly installed isolator ensures the auxiliary battery only charges when the engine is running and disconnects when the engine is off, preventing battery drain.
Tools & Materials Needed
Before starting, gather the following:
- True® battery isolator kit (12V)
- Deep-cycle auxiliary battery (AGM or lithium)
- Battery tray (Prado-specific)
- 4–6 AWG battery cables
- Fuse holders and fuses (50A–150A)
- Cable lugs and heat shrink
- Crimping tool and wrench set
- Dual display volt meter
- Protective gloves and safety glasses
Below is a Step-by-Step DIY Guide Tailored for the 2024 Prado:
Step 1: Safety First
Always start by disconnecting the negative terminal of your starter battery to avoid short circuits or electrical damage
Make sure:
- Engine is off
- Vehicle is in park
- No sparks or open flames nearby
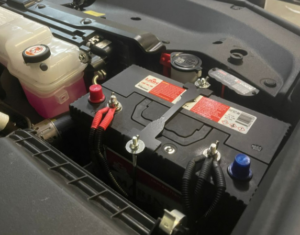
Step 2: Install the Auxiliary Battery
Mount the auxiliary battery in a secure location:
- Under the hood (if space allows)
- Rear cargo area with a battery box
Ensure:
- Proper ventilation
- Heat protection
- Firm mounting using a battery tray
Step 3: Mount the True® Battery Isolator
Install the True® isolator close to the starter battery:
- Keep it away from extreme heat (engine/exhaust)
- Use vibration-resistant mounting points
- Maintain short cable runs for efficiency
Mounting near the battery improves performance and reduces voltage drop
Step 4: Install Circuit Protection (Fuses)
Install fuses on both batteries:
- One near the starter battery positive terminal
- One near the auxiliary battery
This protects your system from short circuits and electrical faults
⚖️ Comparison: True® Dual Battery Kit vs. Basic Relay Setup
| Feature | True® Smart Dual Battery Kit | Basic Voltage-Sensing Relay |
|---|---|---|
| Works with Smart Alternators | ✅ Yes | ❌ No |
| Starter Battery Protection | ✅ Always preserved | ⚠️ Risk of drain |
| Fuse & Cable Safety | ✅ 40–60A matched to 4 AWG | ❌ Often undersized |
| Battery Options | ✅ AGM & Lithium supported | ⚠️ Limited |
| OEM Integration | ✅ CAN bus compatible | ❌ Not supported
|
Step 5: Wire the System
Main Connections:
- Starter Battery → Isolator Input
- Isolator Output → Auxiliary Battery Positive
- Auxiliary Battery Negative → Chassis Ground
Use heavy-duty cables (4–6 AWG) for efficient power transfer.
Step 6: Grounding
Proper grounding is critical:
- Connect both batteries to a solid chassis ground
- Clean contact points to ensure good conductivity
- Use thick ground cables equal to positive cables
Poor grounding can cause voltage drops and system failure
Step 7: Optional Accessories Wiring
Once the dual battery is installed, connect accessories to the auxiliary battery only, such as:
- 12V fridge
- LED lights
- USB chargers
- Inverters
This ensures your starter battery remains untouched
Step 8: Reconnect & Test
Reconnect the starter battery negative terminal and test:
- Start the engine
- Check voltage at both batteries
- Confirm isolator engages (charging both batteries)
- Turn off engine and ensure isolator disconnects
A properly functioning isolator will:
- Charge both batteries when running
- Isolate them when off
Step 9: Final Inspection
Before hitting the road, check:
- Tight cable connections
- Secure mounting
- Proper fuse placement
- No exposed wires
Pro Tips for Toyota Prado Owners
- Newer Prado models (150/250) may benefit from a DC-DC charger, but isolator kits like True® still work effectively for many setups
- Use AGM batteries for under-hood installs due to heat resistance
- Upgrade to thicker cables if running high-load devices
Conclusion
Installing a True® dual battery isolator kit in your Toyota Prado is a practical and rewarding DIY project. With the right setup, you’ll enjoy reliable power for all your accessories while keeping your starter battery fully protected.
Whether you’re heading off-road, camping, or working remotely, this upgrade ensures your Prado is always ready to go.