
Marine Lithium Dual Battery Setup: Full Wiring Diagram & Install Guide Video
The lithium batteries becoming a new standard in boating a lot of people don’t know that you shouldn’t charge your lithium batteries right off your outboard and the reason for that is that the voltage differences between how to charge a lithium and the alternator on the outboard are very very different with that being said being able to keep your lithium batteries charged with the alternator and the outboard is super useful one of the most effective ways you can do that is setting up something called a lithium battery isolator kit for this video I’m going to go over how that works and what you need to do to get it installed okay so before we get into installation.
Scripts
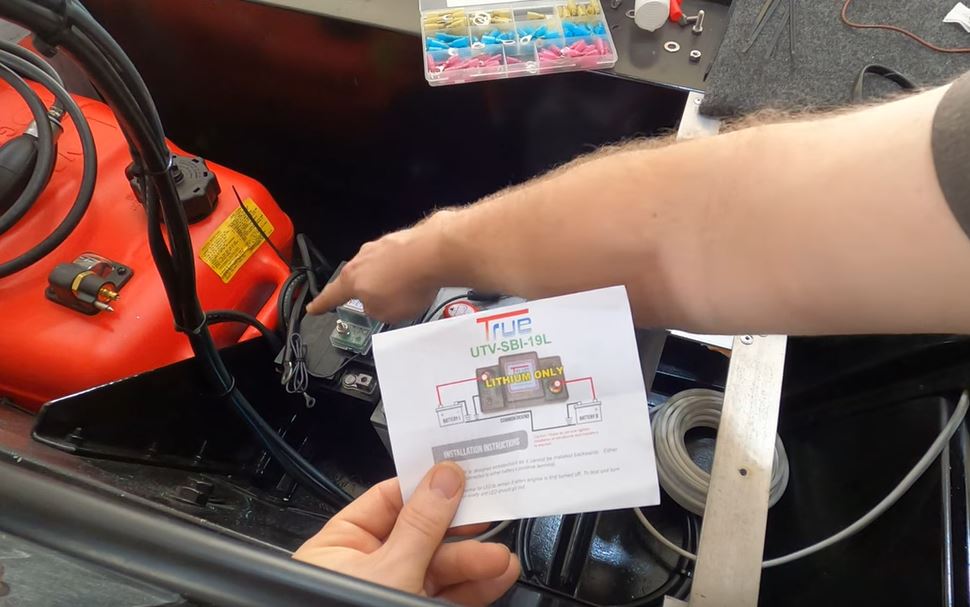
I’m going to do a brief overview on how this all works. I will show you guys a simple dual battery wiring diagram for boat and then we’ll jump into it. So the wiring diagram for this is pretty simple. We have to run a positive wire from the cranking battery into the Lithium battery isolation manager then we’re going to be connecting the ground from the isolator to the AGM battery. Then running a negative wire from the AGM battery to lithium battery and then on the other side of the True 12v Lithium battery isolator.

We’re going to run a positive wire into the positive end of the lithium battery. Now we know that we need to use our battery isolator between the cranking battery and the lithium battery and that the charge is going to bleed off from the cranking battery once it’s full into the lithium battery.
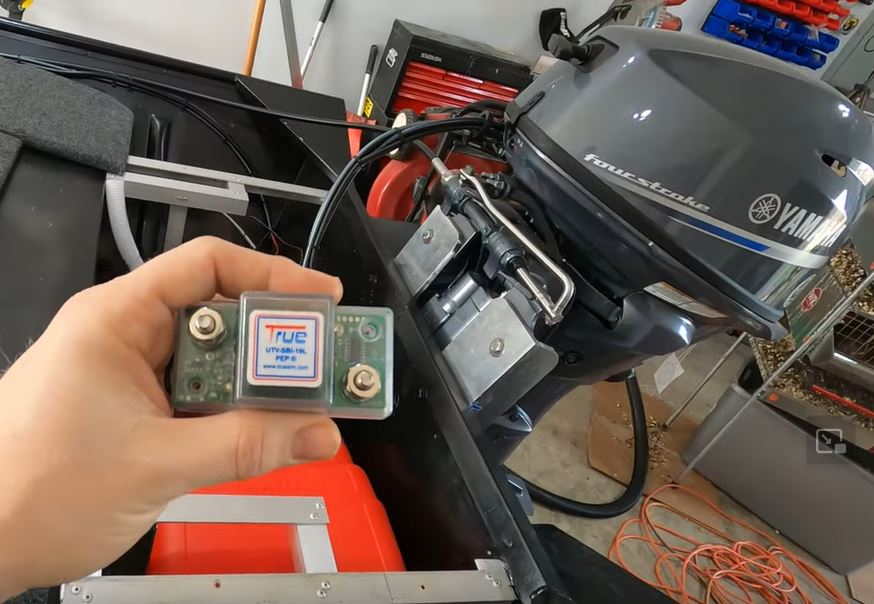
There’s a lot of different battery isolators out there you have to make sure you get ones that are programmed for lithium charging. The one I picked here is one I found on Amazon. This Lithium battery isolator kit by True is pretty affordable. It’s have a great reviews and I hope it works as intended. The setup is pretty simple, so let’s go ahead and jump right into it.
We will see how it works okay so at the moment I have a very basic dual battery setup. This is my lithium battery that handles the accessories like the trolling motor fish finder and things like that.
This is my AGM cranking battery that goes to the outboard. So basically the plan now is to use the heavy-duty Lithium battey isolator to tie these two batteries together so when the outboard finishes charging the cranking battery. Any extra power bleeds off to charge into the lithium battery. The one thing that the Lithium dual battery kit does not come with is wire so I’m going to be using this 10 gauge Marine wire. I’ve been holding on to and we’re going to set up our runs using this for all of my connections.
Shrunk ring connectors
 I’m going to be setting up heat shrunk ring connectors just to make sure everything is nice and waterproof. This is tin coated wire so this setup should be great for the outdoors all right first thing I’m going to do is disconnect my outboard connections we’re just going to move them out of the way for now. so next I’m going to go ahead and mount the isolator earlier than I was thinking that way I make sure that I’m cutting my wire lengths to the correct length comes with a little alcohol prep Pad but just any isopropyl alcohol will work for that and then on to where your battery is going to install attach the velcro to the bottom of the Smart Lithium dual battery isolator.
I’m a big fan of velcro and Marine applications I feel this stuff works really really well all right we’re good we’re gonna have to create a couple different cables at different lengths here. Overall it should be too bad basically the main cables we’re going to need to make positive from your cranking battery to the main Port of the isolator then positive from the charging port of the battery isolator for lithium battery to the positive of the battery that’s to be charged after that. We need to run a negative cable from the first battery to the second battery and then also ground out the best lithium battery isolator on your first battery which is also going to ground to the motor block.
The Kill Switch
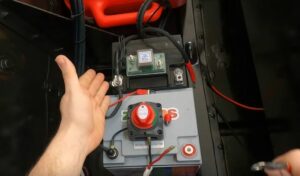
I have my three wires built here in addition to hooking up these cables I’m also going to be hooking up the outboard cables as well as the battery charger. Now my negative connection over here is going to be pretty stacked. Ideally I’m going to be adding a negative bus bar at some point but for now I just want to get this all wired up so it’s functional. Okay so we’re going to start with the ground from the True® Smart Lithium Battery Isolator and then the negative cable that’s going to cross both batteries outboard negative and finally the battery charger negative. Next I’m going to go ahead and connect the negatives. We can get that out of the way as well as my negative interrupt for the kill switch. I am bypassing the kill switch because I want this to charge even if the kill switch is off. okay so I am going to go ahead and flip the True® Smart Lithium Battery Isolation Manager around just to do shorter travel for the positive battery cable. I made this just a slightly bit too short. Now that we have all of our negative connections in place let’s go ahead and hook up the positive connections.
Outboard and charging cable
The first is going to be a lead running from the main section written on the True® smart lithium battery isolator to the charging battery. While we hook this up, I’m also going to be installing the outboard cable as well as the charging cable. Now we have to hook up the positive cable from the Lithium battery isolator 13V to the charging battery now. Just keep in mind, if you’re following along with this I did flip this around to give myself a shorter travel for my one wire. It is built a little thin so if you look at the wiring diagram naturally like this now.
Now this should complete the circuit for us. I’m also going to be including the accessory wire. This powers everything else in the boat so we can make sure that everything else is working as well. Now that we should have everything connected up so we’ll just double check our dual battery boat wiring diagram real quick. From my understanding the way that you can tell this is working. A LED will light up on the True® smart Lithium battery isolator when power is being charged from One battery to another there’s no input power so there’s no power to transfer I’m going to go ahead and plug in the charger and see if we can get this to light up and then we’ll know that our lithium is charging all right.
I’m gonna go ahead and plug in let’s hope for the best switch this over to 12 volt. Now this AGM charger should charge the AGM battery which should then transfer voltage into the lithium battery and there we go the light turned on. Now that means that this should be transferring power over to the lithium now I’m going to go ahead and turn the lithium on and I’m going to go check my connections around the boat to make sure we’re still getting power.
So I just went ahead and turned the trolling motor on and it works. It makes sense for this to have come on as quickly as it did because the AGM battery was already charged. We should have a good charging connection between the True® smart lithium battery isolator kit and the lithium battery. I am going to look up real quick just to make sure I’m understanding the LED correctly.
TrueAm Customer Service
Just to get confirmation, I gave TrueAm a call and their customer service was awesome, they picked up right away. Nnce the blue light comes on that means that active pass-through is happening so in this Lithium dual battery setu, it is working. They did give me a recommendation though they said that when you’re doing a battery charger setup to actually charge your auxiliary battery and let the pass-through happen in reverse to charge your cranking battery. So I’m going to go ahead and swap over my charging cables back to the lithium this is going to be set back to lithium mode. So when I’m at home and I plug the boat in. It’s going to charge my lithium which will then charge my cranking battery but when we’re on the water, the Outboards alternator will charge the cranking battery which will pass through onto the lithium battery.
Small change but it didn’t really affect anything, we still have pass-through charging. We are now charging on the lithium setup which is now going to be charging the lithium battery and it will pass back through to charge the cranking battery at home all right well I’ve given this some time to kind of balance out and the LED light is supposed to remain on basically that is telling me that my cranking battery or the primary battery is fully charged so at that point it will allow a cross transfer of power between the batteries so at this point the best lithium battery isolator is installed for me this is a little complicated first trying to figure out how this all went together checking out the diagrams and all that so I hope you guys found this helpful if so don’t forget to hit that like button.
Related Articles:
Can you use lithium batteries and regular batteries together?
True® UTV Lithium Dual Battery Connect & Monitor Kit UTV-SBI-LCM